Collecting Your Samples
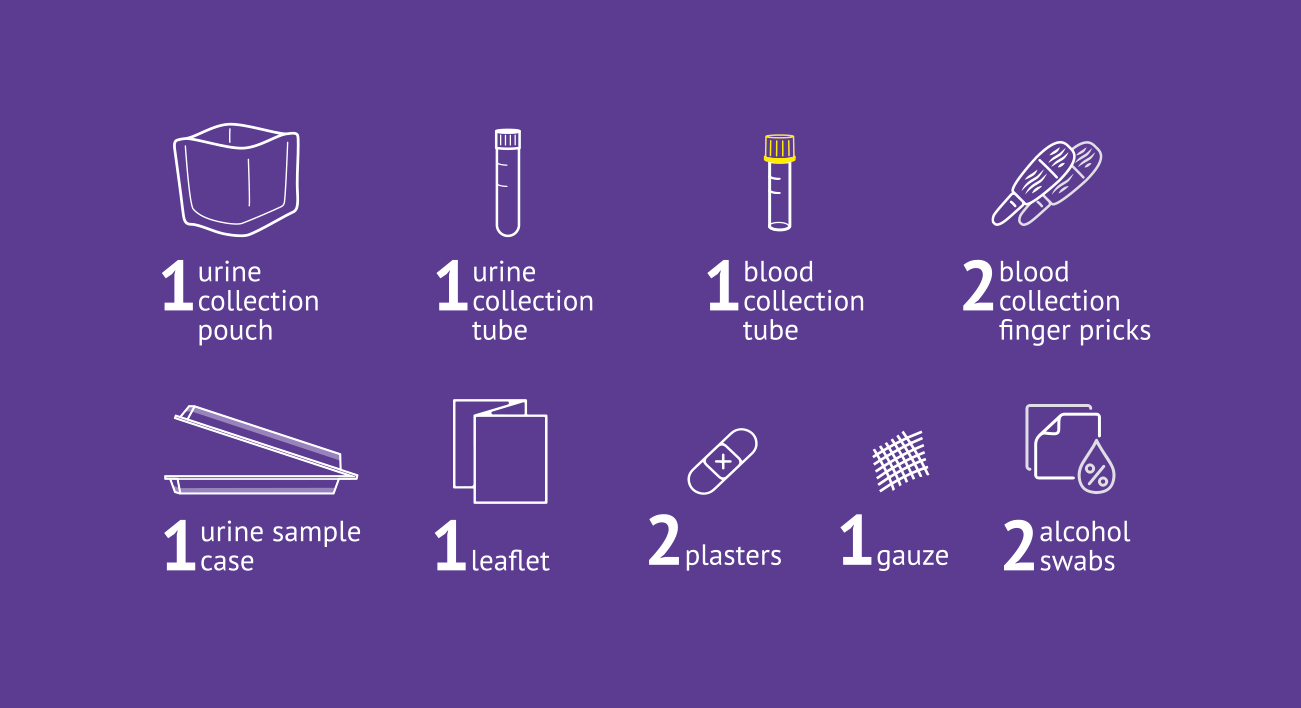
Make sure you have everything in your Kit
Before starting the test, read the guide carefully and make sure your iPlaySafe box contains the items shown.
Step 1.
Sign In To The App To Activate Your Box

Sign Up or Sign In
Sign up or sign in to your own account, it's essential that the information and sample you provide is your own.

Activate Your Box
In the app, activate your box by using the activation code printed on your instruction leaflet

Fill Your Info
Fill in the details on your laboratory form and return it with your samples.
Step 2.
How To Collect Your Urine Sample

Pee Into The Collection Pouch
Before you start, wash your hands. Pee into the urine collection pouch and add it into the urine collection tube.

Check Your Sample
Do not fill above or below the two marked lines, or your sample cannot be processed.

Screw The Lid Back Onto The Tube
Screw the lid back onto the tube and place the tube inside the ring sample case. Your sample is ready to be returned.
Step 3.
How To Collect Your Blood Sample

Make sure your hands are clean and warm
Before you start, drink plenty of water and wash your hands.
It is important your hands are nice and warm so rub them together vigorously.

Use The Alcohol Swab
Use the alcohol swab to clean your selected fingertip, and wipe it dry with the gauze.

Prick Your Finger
Twist and remove the blue cap from the finger prick. To prick your finger, lay your hang on a flat surface.

Encourage The Blood Flow
Press the finger prick firmly into the middle of your fingertip. To encourage the blood flow we recommend standing up, holding your arm downwards, and massaging the length of your finger from your palm to your fingertip.

Collect The Blood In The Tube
Place your finger over the blood collection tube. The tube must be filled to the top line marked on the side of the tube. If you can’t get enough blood droplets, prick another finger.

Close The Tube
Replace the lid back on the blood collection tube and press down firmly until you hear a click. Tip the tube upside down 5 to 10 times. Your sample is ready to be returned.
Step 4.
How To Return Your Samples

Put Your Samples In The Box
Place your samples back into the box along with the laboratory from. Inset both large tabs into the slots and press firmly to secure the box. You can apply the clear security seal (or tape) for added security.

Post Back Your Samples
No stamp needed, so you can pop the box in any postbox. Remember to post your samples back to use as soon as possible after collection.
STEP 5.
Your Results

Results That You Can Track
Once your sample has been processed, you will receive your results directly on your app within 2 to 5 working days

Status That You Can Share
After receiving your results, you will have access to a 'play badge' for 6 months. Create a profile to claim your badge. The badge is your key to share your verified status with others.

A Medical Team, That You Can Speak With And Trust
You will have the option to discuss your results with a member of the nursing team. Our pharmacy partner can provide prescription and treatment, if suitable.